

Other settings
Introduction
On this page you will find some settings to make your gameplay more enjoyable and more customizable, such as:
- Launch Fivem directly on pure mode and/or join the servers directly
- Add hotkeys / keybind to your keyboard, mouse or controller
- Add a crosshair without any additional software
- Change your 1st person FOV above the GTAV limit
- Create items & weapons “loadouts” using commands
- Add custom skins to weapons using Base64 encoding
- Use vehicles indicators
Enable pure mode directly
There are 2 ways to enable pure mode directly when launching fivem, without restarting the game:
Running from Start Menu
- Search for “FiveM” in the start menu
- Right click FiveM → open file location
- Right click the FiveM shortcut → properties
- In the “Target:” box, add
-pure_1to the end of the file path.
It would look likeC:\Users\YOURUSERNAME\AppData\Local\FiveM\FiveM.exe -pure_1
Running from Desktop Shortcut
- Right click your desktop shortcut → properties
- In the “Target:” box, add
-pure_1to the end of the file path.
It would look likeC:\Users\YOURUSERNAME\AppData\Local\FiveM\FiveM.exe -pure_1
Add hotkeys / keybinds
There are 2 ways of adding custom hotkeys and keybinds:
Using the CNR menu
You can add hotkeys for the number keys between 1 to 0 (after 9 ) directly using the CNR settings :
- Open the CNR main menu using M / holding

 , go to “Options” then “Hotkeys”.
 - Choose the slot you want to put a hotkey on then press ENTER /

 .
. - Choose whether you want it to be an item to consume, a weapon to equip or a chat command to execute.
Using the FiveM console
You can use the FiveM console to add custom keybinds to all the keys of your keyboard, mouse or controller, but it only works on commands. However, it also gives you the option to add multiple commands to the same key. To do so :
- Open the FiveM console using F8 .
- Type rbind gtacnr keyboard “key” “command” , key being the key used for the keybind, and command the command (without the ”/”) that you want to apply to the key.
Here is an example custom keybind :
rbind gtacnr keyboard "k" "e lean4; use coke 5; use heroin 2; use meth 2; wait 10000; e passout"With this keybind, each time you will press the k key the following will happen:
- Play an emote to lean on a wall
- Consume 5g of Cocaine, 2g of Heroin and 2g of Meth at once (If you have enough of them)
- Wait 10 seconds for the drugs to take effect
- Play an emote to “passout” (fall to the ground as if you’re doing an overdose)
Those keybinds will only work on CnR servers, so you won’t have trouble with this keybind on other servers. (unless you use bind keyboard directly)
Custom crosshair
To use a custom crosshair and edit it directly in FiveM without using any outside software / application, there are currently 2 ways to do that: using the in-game menu, or using a website to create a “crosshair” template to put in game.
Using /crosshair menu
By typing /crosshair you will be able to access a menu that will allow you to “create” a crosshair that you will be able to use directly in-game:
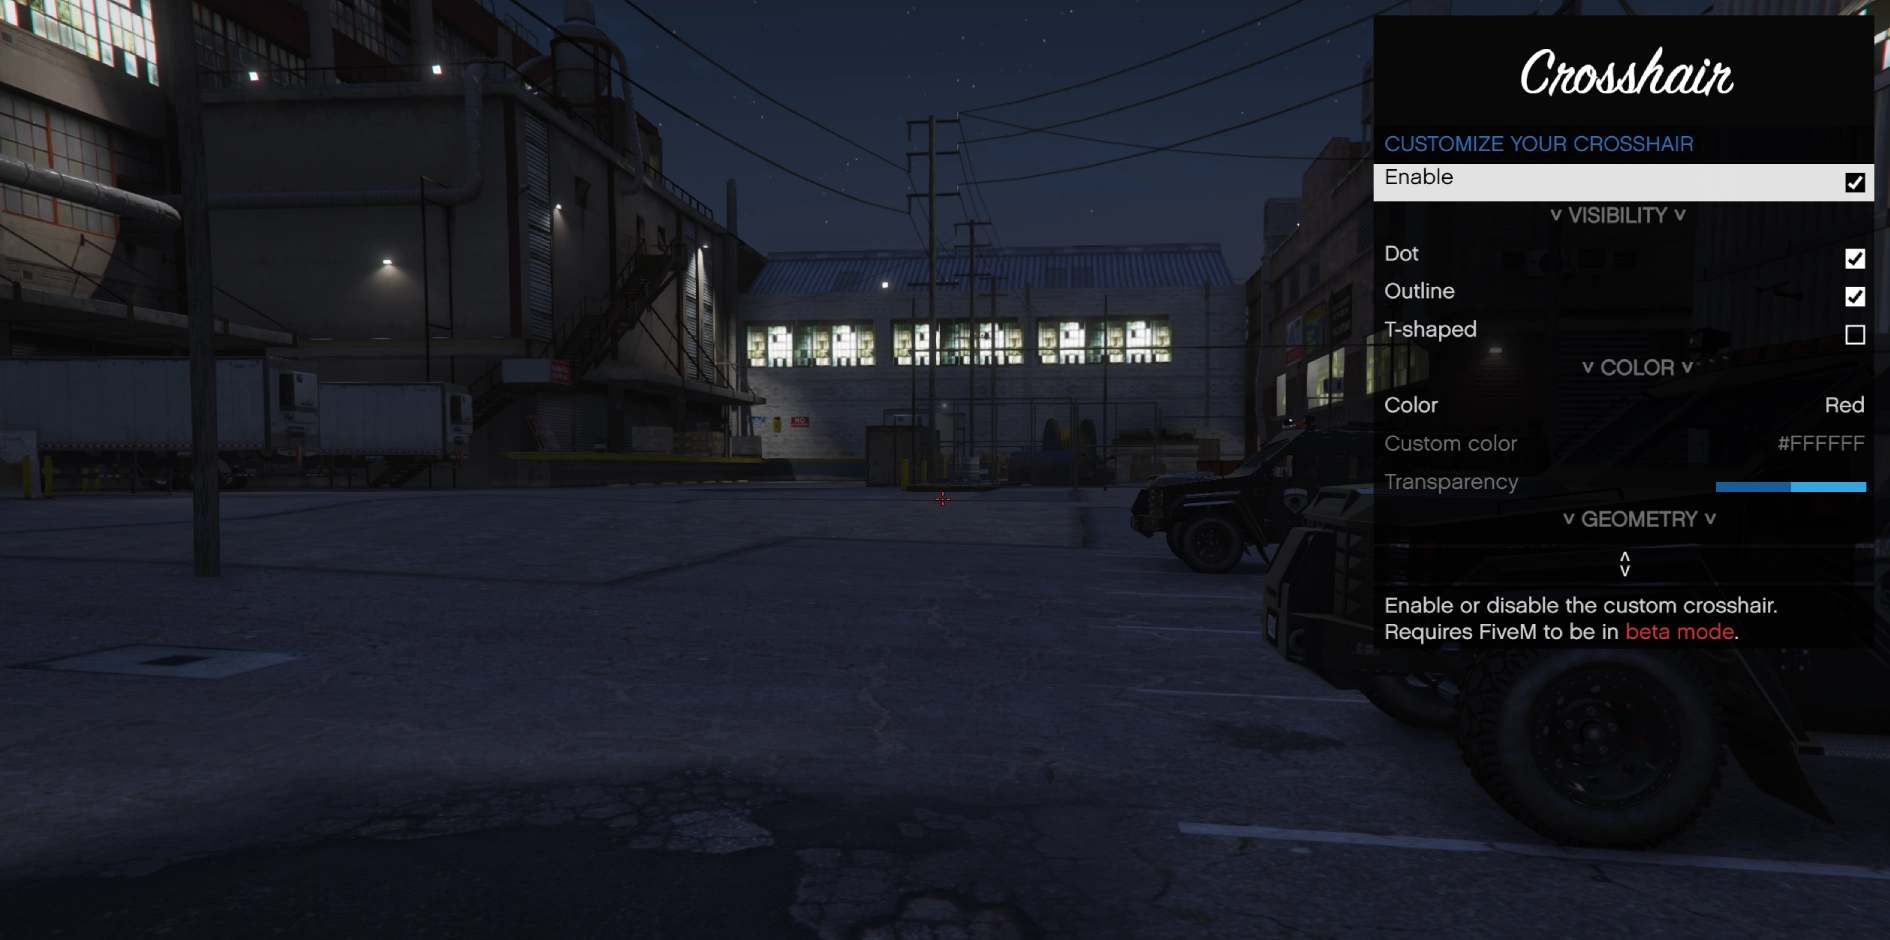
Once you are done creating your desired crosshair with all different settings, you will be able to copy a pre-made command to create the custom crosshair:
For this command to work, you will have to open the FiveM console by pressing F8 , then you just have to press CTRL+V to paste your crosshair command!
Using a crosshair generator website
First you need to create a crosshair and have the template to use it in game.
You can use this website → Custom Crosshair Generator to create your own crosshair (it uses the same crosshair system as Counter-Strike 2). Once your crosshair is created, copy the command line at the bottom of the creation menu : This will be the command you’ll have to type in the Fivem console.
Once you have your crosshair command, open the FiveM console using F8 then paste the command you copied from the website.
As an example, here is a cross-shaped red crosshair you can use :
faq_crosshair.png
With this being the command entered in the console to create it:
cl_crosshairalpha "255";cl_crosshaircolor "5";cl_crosshaircolor_b "8";cl_crosshaircolor_r "180";cl_crosshaircolor_g "8";cl_crosshairdot "0";cl_crosshairgap "-6";cl_crosshairsize "5";cl_crosshairstyle "4";cl_crosshairusealpha "1";cl_crosshairthickness "1.5";cl_fixedcrosshairgap "-5";cl_crosshair_outlinethickness "0.5";cl_crosshair_drawoutline "0"Once your typed the command, you’ll have to activate it (it’s deactivated by default), and to do that you need to enter this command below:
cl_customcrosshair trueHave wider FOV than normal
If you’ve seen the clips of some experienced pvp players on CNRV, you must have noticed that some of them have way wider FOV than what is usually allowed by GTAV: that is done by using the Profile_fpsFieldOfView x in the F8 FiveM console, “x” being your fov value. As an idea of what value to choose:
- 15 is the default fov
- 20 is the maximum default fov allowed by regular GTAV settings
- 70 or above is the maximum fov possible without using any additional software
Create weapon loadouts
For the moment is it impossible to have different loadouts depending on your job (Civilian, Cop, EMS) using the scripts available on CnR, but until then one way to have pre-made “loadouts” is to use the bind commands explained above.
Here is a quick example for a criminal loadout :
unbind keyboard "6"; unbind keyboard "7"; unbind keyboard "0"; rbind gtacnr keyboard "6" "equip weapon_carbinerifle_mk2"; rbind gtacnr keyboard "7" "equip weapon_gusenberg"; rbind gtacnr keyboard "0" "equip weapon_knuckle"Using this command on the F8 menu will do the following :
- Unbind the hotkeys 6 , 7 and 0
- Replace them with Carbine Rifle mk2 (AP bullets) for 6 , Gusenberg (LMG) for 7 and brass knuckles for 0 .
This will allow to replace the “previous” loadout with a typical “criminal” loadout instead.
You’ll have to manually type the pre-made command everytime you switch jobs (it cannot be done automatically yet), but you can add as many hotkeys as you want between loadouts using this way and it’s pretty fast to do it too.
Base64 weapons skins
Although there are some additional skins added to weapons by Weapons editors on CNRV, you might want to add your own skins… sadly since the server is on Pure mode, any client-side weapon-skin modifications won’t work on CNRV.
That’s where the Base64 textures feature comes ! Using a tool to convert .png / .ytd textures into a base64 code, you can then add this base64 code in the Custom textures feature so that the game uses your custom textures without any client modifications !
However, you are limited in what you can do with just Base64 textures:
- Custom animations will not work with the StringBased64 Method.
- Custom attachments will not work on StringBased 64 Method either.
To add custom skins, you need to go to CNRV menu (M / hold 
 ) → Armory → Any supported weapon then press F2 /
 .
You will then have to put each converted texture file required (body, skin, etc) until all are in to use your skin!
.
You will then have to put each converted texture file required (body, skin, etc) until all are in to use your skin!
Send any GIF to chat
If you have a GIF you want to send on the CNRV text chat, without having to browse the tenor search menu, you can do so by:
-
Finding a gif on Tenor (or upload one)
Your text:
https://tenor.com/nl/view/cat-wet-shower-bath-water-pouring-gif-17140437 -
Right-click and select open image in new tab
Your text:
https://media1.tenor.com/m/RUCmdkzaIsoAAAAd/cat-wet.gif -
Copy everything past /m/
Your text:
RUCmdkzaIsoAAAAd/cat-wet.gif -
Depending on if you selected “Gif in SD” or “Gif in HD” in step one (theres a button under the gif, or not if it is only available in low SD-quality), replace the “d” with a “C” before the gif name. In this case, that would be this d:
RUCmdkzaIsoAAAAd/cat-wet.gif
If you selected “Gif in HD”, you wont have to do this.
Your text:
RUCmdkzaIsoAAAAC/cat-wet.gif -
Add
{t=to the beginning and}to the ending{t=RUCmdkzaIsoAAAAC/cat-wet.gif} -
Paste it in the chat
Credit to Glints in this 📌・forum for this tutorial ❤
Use indicators
Although it is a purely cosmetic feature for immersion & photography, you are able to turn on/off each of your vehicle indicators using commands:
- /indicator r will turn on/off your right indicator.
- /indicator l will turn on/off your left indicator.
- /indicator all will turn on/off both indicators at once.
Not all vehicles have indicators support so some of them might be glitched / not work (example : Progen Itali GTB)